Showing posts with label drafts. Show all posts

Wednesday, March 1, 2023

Designing with Blocks Using Mathematical Sequences

Using mathematics to design weaving profiles or sequences is a theme that I return to over and over.  I have relied on writings about this subject because my mathematical knowledge is relatively rudimentary.  I was very lucky to have found this document in the Ralph Griswold collection of weaving documents stored at the University of Arizona website.  "Algebraic Expression in Handwoven Textiles" by Ada K. Dietz  

This is my journey into designing a profile and weaving drafts based on the mathematical expression of the cube of a binomial  (a + b) ³  My interpretation of this expression is aaa + aabaabaab + abbabbabb + bbb. I regrouped this into aaaaa b aa b aa b a bb a bb a bbbbb  Below is the two block profile created from my interpretation.


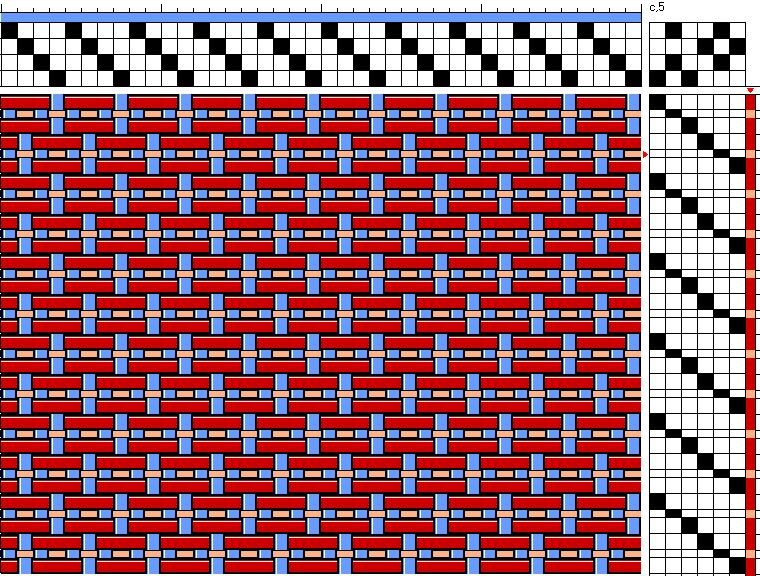
The next steps are to convert this into weaving draft using block substitution. With four thread blocks, the draft uses 8 shafts. With 5 thread blocks, the draft uses 10 shafts - and so forth. The most common substitutions are with 3/1 and 1/3 twill blocks, but I’ve found that more interesting designs can be had
when you think outside the box. 
The following draft interprets the profile using 3/1 and 1/3 twills. But  this tie up could be altered in one or two quadrants to a broken, 4 thread twill. What fun that might be.
 

 The block conversion below uses a 3/2 twill and an altered 5 thread twill, (which doesn’t have a regular twill line). See the little squares in the design where the altered twill is weaving in block B

This conversion uses a regular 5 thread satin and an altered satin tie up


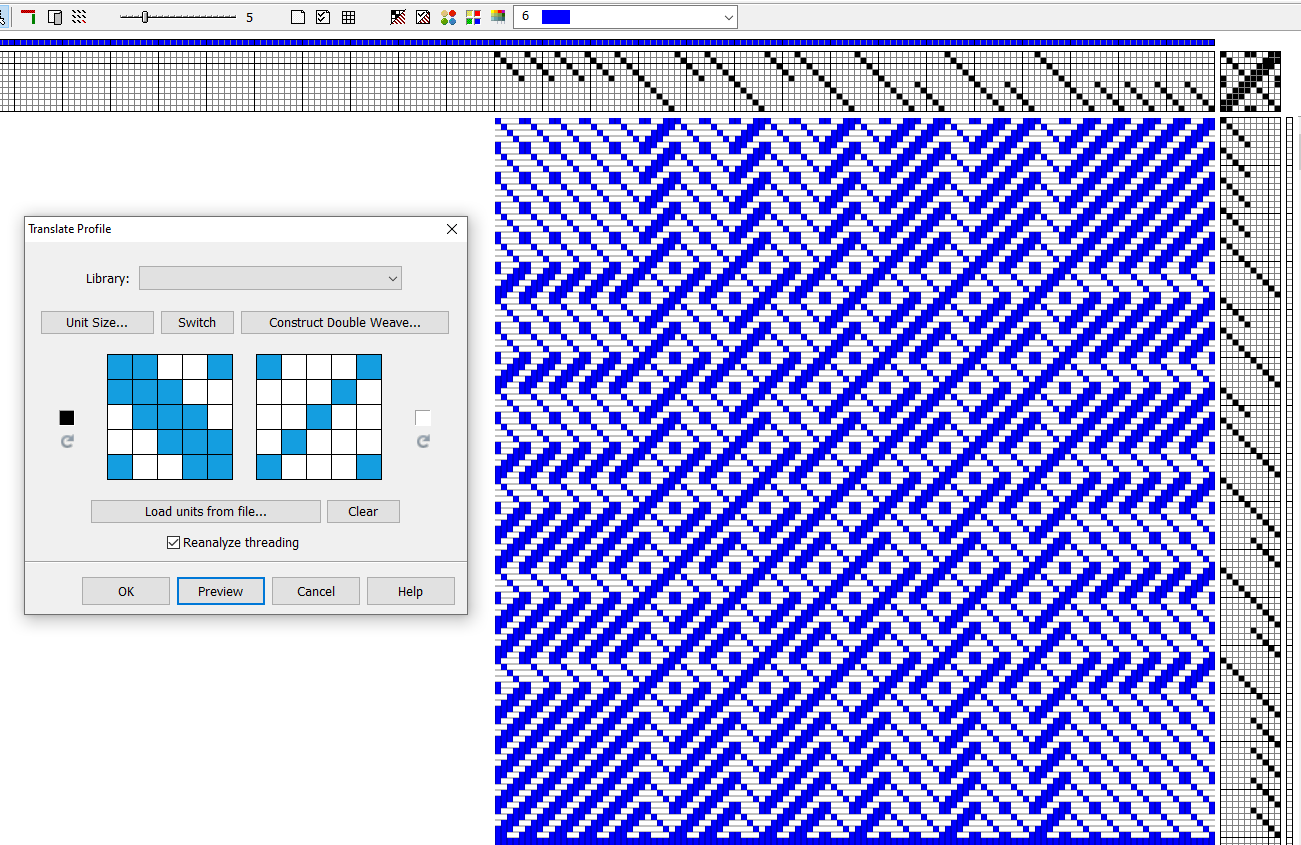
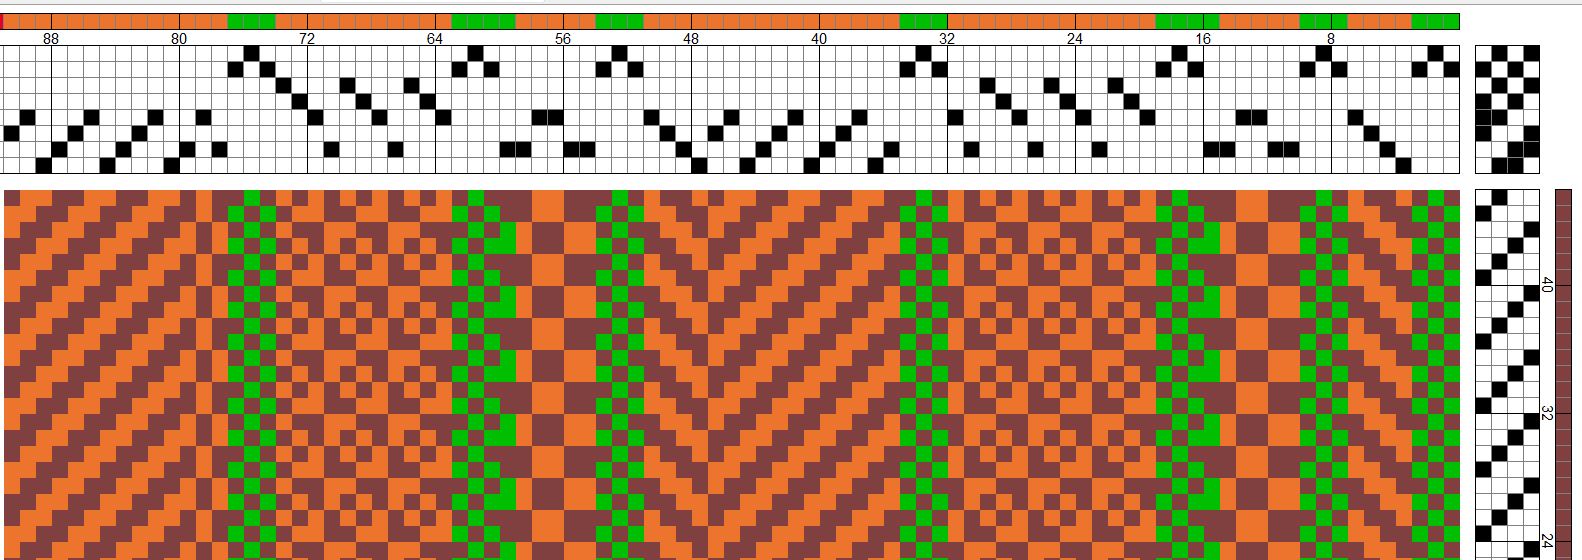
The following draft uses two altered 5 thread twill blocks. I discovered this option in Handweaving.net. To me, the lines look wavey. The surprise is that my weaving software (WeavePoint) analyzed the threading and found it could be woven on 8 shafts.  In checking further, I also found that Handweaving.net will compact this draft to 8 shafts as well. How great is that!


Below Block A uses an altered satin tie up and Block B uses a 5 thread altered twill tie up. Busy, but the profile is still visible.


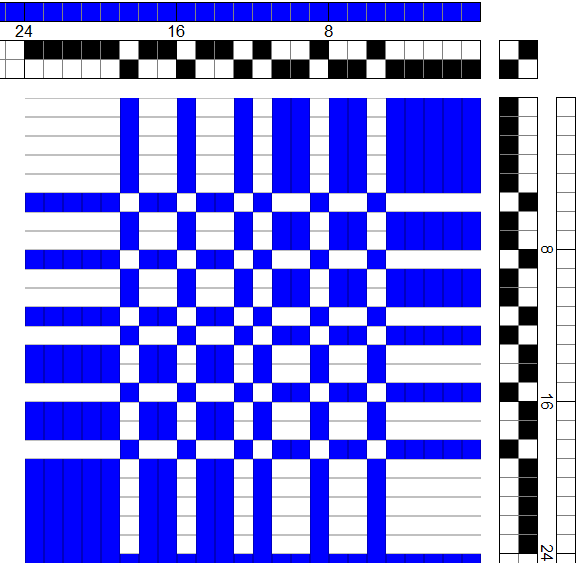
The next draft uses 5 thread satin blocks. The dark block is flipped horizontally and reversed so that dark now becomes light. The draft doesn’t have clean cut edges where the two blocks meet.

There are, of course, many more options to interpret this profile.  Feel free to experiment and enjoy the results!

Monday, November 7, 2022

Shadow Weave and Weaving Software

It's been an interesting few days spent exploring weaving software and how to convert a profile draft to a shadow weave draft.  I thought I would share what I learned in a post.

 The conventional ways to convert profiles into shadow weave involve having a profile draft with a tie up that lifts 1/2 of the shafts such as a 2/2 twill or a 4/4 twill tie up.  Most weaving software programs don't give you a block substitution for conversion, but I found three that do.  WeavePoint, Proweave & Windows Weaveit Pro.  

It all started with  a profile draft on Handweaving.net  (#32432) that I liked and wanted to see how it would look in shadow weave. 

Because my weaving software of choice is WeavePoint, I tried translating it to shadow weave using the Translate Profile option.  WeavePoint gave me what I was looking for.  A four shaft, shadow weave design.  Great!

I had my draft and could have stopped there.  But, I didn't.  I wanted to see what other software programs would do and this is where it got interesting.  I found that Fiberworks didn't give me any options to convert profiles to shadow weave.  I did find that there were tutorials to help you do this - but with one caveat, that the tie up be in the format of 2/2, 4/4, 6/6 etc.   I didn't have this in my original profile and if I put a tie up like that into my profile the whole design would be different.  

Then, I tried Proweave.  I don't use this software very much, but it does have a lot of translation options to different weave structures.   I found a bunch of different options, so I took the one for four blocks and no incidentals.  


Great - but this is an 8 shaft draft and the block lengths have been expanded.  I could work on the draft to downsize the length of the blocks, but it didn't seem like a better choice than WeavePoint gave me.

Off to Windows Weaveit Pro.  This program gave me three options for converting my profile.  Atwater method, Powell method and Lang and Voolich method.  This was interesting because I hadn't heard of Lang and Voolich before - something new to me.  My first tries were with Atwater and Powell.  Both of the translations gave me a draft - but not for the original profile.  Instead, the software had evidently changed the tie up to a 2/2 twill because when I changed my profile tie up and looked at the pattern, the translated pattern looked identical to the thread by thread draft.  Next I tried the Lang and Voolich option.  Yeah - it gave me a correct draft, but again, one for 8 shafts.

I could have stopped there, but I really wondered why WeavePoint would give me a 4 shaft draft and the other two programs gave me an 8 shaft draft.

As I looked at the WeavePoint version, I realized that actually the profile was three blocks and Weave Point had analyzed this before it translated my profile.  And, where there was a transition from Block A to Block B, there was a double thread inserted so that the color sequence of dark and light wouldn't be interrupted (examine the first draft in this post).


So, I went back to the three programs to see how they would deal with my new, three block profile.  WeavePoint was happy.  It translated  exactly as it had the first time.  Proweave, translated it to a 6 shaft draft and Windows Weaveit Pro wouldn't give me an option to translate it at all.

 I think if you examine the profile and the solution that WeavePoint gives you, you could probably figure out other profiles.  I also tried to find Lang and Voolich's monograph, Parallel Shadow Weave  but couldn't find any current source for it.  Even Complex Weavers didn't have a copy in their library.  It would be interesting to see how their solution worked - even though it wasn't as elegant a solution as WeavePoint gave me.    

 Yeah for the WeavePoint programmer, Bjorn Myhre.


Saturday, November 27, 2021

Anatomy of this year's Christmas towels

 Quite a few years ago, I read a paper called "Designing with Farey Fractions" by Ralph Griswold.  Ralph was a computer scientist with a penchant for weaving drafts and weaving design.   I did some designing using a Farey sequence as the threading for an 8 shaft draft and wrote about the process here in this blog. https://bannermountaintextiles.blogspot.com/2013/07/farey-fraction-towels.html    The results were interesting (to me) but recently I began to think about other things that might be done with this Farey sequence used as a profile draft. 

I digress a bit here to tell you that I don't understand the mathematics involved.  Yes, I've looked at the papers and most of it is just out of my league.  However, using mathematical sequences in weaving design is very much something that I understand and can use.

I started thinking about how I might weave green and red towels for Christmas sales without the problems of green and red crossing one another and blending into brown.  The solution appeared to be to use blocks of weave structure so that the colors of red and green would appear more or less solid against one another.  Which comes back to using a profile draft and translating it to satin and block twills to weave my towels.    I selected the Farey sequence above for my threading profile and converted it into a series of drafts using 5 thread satins and 5 thread twill blocks. 8 blocks times 5 thread structures translates to 40 shafts.  How lucky for me that I have a loom that will weave these designs!

In preparing the ideas for my warp color, I used stripes of red and green which used portions of the profile that would give a different design for the two color stripes.  Red and green yarns were another problem.  I didn't have any of the specific value in my stash that I wanted for the warp, so I wound off 2800 yards for the green warp stripe and 2800 yards for the red warp stripe. I dyed each of the 2800 yards in the same pot so that I would get exactly the same colors - although, a variation in the warp color stripes could have been interesting too.

 1/5 and 5/1 twill blocks


 This towel was woven with 5 thread satin blocks making it a damask cloth.  And all without a Jacquard Loom!


Accidental Christmas trees appeared in this variation.  Again, the structure is 5 thread satin.

I was able to weave 11 different towels on this 12 yard warp and still had designs left that I could have woven.  This last towel was woven with a dark green weft which almost changed colors once it was planted on the lighter green and the red warp stripes.  I'm always amazed at the differences you can get from variations in weave design and weft colors and must say that I didn't tire of what kept emerging as I wove.

I guess the final question is whether or not I'm done with Farey Fraction sequence weaving.  Probably not.  I expect that the next warp will expand the sequence into a larger design - but who knows, it may take me years to come around to the next iteration in my fascination.

Postscript!

For more about Farey and his fractions, here is a Wikapedia article  and a photo of the Farey Fraction sequence up to 8.  Use the denominators for your own sequence work.

If you are interested in satin weaves and  their various counters, here are a couple of resources that help to explain how they are formed. The documents contain almost identical information but in somewhat different format.  If you eyes aren't glazed over when you finish with these documents, I don't know what it will take☺

http://www2.cs.arizona.edu/patterns/weaving/webdocs/mo/D/SatinCounters.pdf

https://www2.cs.arizona.edu/patterns/weaving/webdocs/gre_satn.pdf


Friday, August 27, 2021

Using WeavePoint to design an amalgamation draft

 I've been fascinated with amalgamation drafts since I first read Alice Schlein's Network Drafting: An Introduction.  Recently, Alice published a new monograph  called Amalgamation: Double your Dobby and I eagerly purchased a copy directly from her.

As I read the monograph, it appeared that only some weaving software programs were capable of copying the drawdown portion of the draft and pasting it into the threading.  I use WeavePoint for most of my design work, so I went to AVL to see if the programmer of WeavePoint, Bjorn Myhre could help.   At the same time, Bob Kruger from AVL sent the question to Jannie Taylor.  Between the two responses from Bjorn and Jannie, I was able to amalgamate to my heart's content!  So - thanks to both of them for making my software just a bit more valuable to me.

The following is my process.  I've also tried it with Fiberworks for PC and it works well there too.  Choose a threading that you want to amalgamate.  You will notice that I have selected a threading that can be duplicated, in other words, I haven't ended on shaft one so that it repeats without double threads.  Alice's method is just a bit different and she does put in threadings that begin and end on the same shaft.  (More about that later).


The next step will be to add a satin tie up and select "tromp as writ" to fill in the treadling.  In the example below the counter is 11.  (Satin counters are explained in Alice's monograph which I recommend buying if you are interested in doing this kind of design work.)  A plus to WeavePoint software is that you select Fill from your options bar - then select satin.  This feature will give you all the counters that will work with the number of shafts in your design.  Otherwise you will need to research satins for the number of shafts you are working with.

Then, change from tie up mode to liftplan mode.  This will give you a liftplan that you can paste into your threading.  So - copy the liftplan and paste it into the threading to the left of the original 


Change back to a tie up and treadling and do another "tromp as writ". 

 
Now you are ready to get rid of the satin tie up and experiment with twill tie ups.  Check the float length when you have one that pleases you.  Sometimes it can be hard to get something that has  floats that are 5 or less in length.  WeavePoint makes searching for a tie up easy too.  In the Fill option, select twill tie ups.  You will be able to set the float length for the tie up.  I usually start with 3, sometimes need to go down to 2 in order to find a tie up that won't result in too long floats in the drawdown.


You can use the draft as is now, or do another little fiddle bit.  I often copy the entire threading and then use "paste special" which is found in the Edit menu.  Click on "flip vertical" and then paste that threading to the left of the original threading.  This option gives you more designs.


The final bit of information that I gleaned while working with Alice's monograph and my WeavePoint design solution is that when you copy the original liftplan with the amalgamation in it, you can paste it into the threading by doing  a vertical flip (again use paste special in the Edit menu)  This allows you to start and end on the same shaft with your original threading.
 
3/18/23  This is a postscript to this post.  I recently found that Handweaving.net has a feature that automatically will make a series of amalgamation drafts online.  Watch the tutorial https://www.youtube.com/watch?v=P4cysOpJSKk   and see what you think.  You can always upload one of your own drafts to the site and manipulate it online as well.  Amazing tools that make our weaving design life so much better.


Monday, September 4, 2017

I'm in love with turned Atwater-Bronson

It seems you can put something on a back burner and not get to it for years.  And then, all of a sudden something kicks in and you decide to give it a whirl.  That's what happened to me recently when I revisited some turned Atwater-Bronson drafts in Strickler's book, #613-#628 contributed by Mary Smith. One of the problems is that you have to deal with a profile treadling.  The threading and tie up is given, but you do have to dig in a bit and figure out the treadling sequence.  Mary Smith spells it out in her explanation, but I had to talk to another weaving friend to get things to click in my brain. Here is a draft if you have the same problems that I did with the profile.  You will notice that I start with the plain weave picks on treadles one and two and then do the pattern picks (in this case on treadles 3 & 4 or 5& 6 or 7&8).  In the profile treadling, think of these as substitutions for Block A, B & C.

Draft #618
 Each of the threading sequences is 36 threads long in these drafts.  I have a forty shaft loom, so I put the threading into a straight draw and added a basketweave selvedge for a towel series on 15 yards of fairly crisp cotton.  I figured I wouldn't be able to weave all of the samples, but should be able to get through a lot of them.  I also decided that a crisp linen feel would be ideal for the drafts, not thinking it through to realize that the threads wouldn't distort as much as all cotton would have. 
 
I wove off my 15 yards and used lots of different linen, ramie and cottolin wefts.  The basketweave selvedge was superfluous and plain weave selvedges would have probably been a better choice, but the basketweave performed nicely.  I also used the trick of soaking my linen weft bobbins in water so that the threads would bend nicely at the selvedges.  It worked beautifully. 
 
You will also notice, if you have a copy of Stricker's book, that many of these drafts use more treadles than are usually available on an 8 shaft floor loom.  Another reason to put it into a dobby to weave.  The photo below is draft #628
 
After my towel warp was completed, I dug out a couple of painted skeins that I dyed in a class I had with Kathrin Weber.  The fiber is bamboo and I thought that perhaps the color variation would look good if used for both warp and weft.  I decided on a 15" wide piece for yardage for a potential garment (or portion of a garment).  When I had woven off all of the dyed yarn, I still had a little warp left and chose a coral rayon to finish off the warp.  Turns out, I should have used it for the entire piece because I like it much better (photo on right). These are woven with draft #621 and the details are mostly lost in the longer yardage piece because color interplay.  However, the texture is wonderful.

 
OK, still not done with these drafts.  Quite a few years ago I purchased some silk mill ends.  The quality of the silk is very nice, but there are knots and splices in the yarns.  Also, the colors were pale and really nothing that I wanted to use, so they rested in my stash for many years.  Several months ago, in a frenzy of dyeing, I wound off almost all of the cones into skeins and overdyed them in a myriad of colors.  I deliberately did not want an even dye job, so sometimes the original color peeks through, or maybe I poured in magenta after the pot was hot and it struck here and there.   
 
I wound a warp 5 yards long and 12" wide for a couple of scarves.  The warp was copper, with bits of blue showing through from the original color.  The first scarf was woven off with a light blue weft to see if I could get iridescence.  I did.  The second scarf weft was a celery color and it is also iridescent.  Am I done - probably not.  I still need to experiment with weaving these drafts in cotton and getting a nice deflection of the threads.

The upper photo is draft #622 and the lower photo is #681


Sunday, July 16, 2017

Twill Shawls

I was browsing through my yarn stash in early April and stopped to admire the large quantity of Malibrigo wool sock yarns that had been collecting over the past few years.  Each time my local Ben Franklin had a sale, I picked up a new skein.  They are wonderful yarns with so much color it makes my heart sing when I look at them.  (Which is exactly why I bought them in the first place).  I started laying the yarns out  to see how the colors meshed and then added some more sock yarns from my stash that I had dyed and others that a friend had dyed (Wooly Daisy).  Shawls, I thought.  Big woolen shawls with loads of color.

The first thing was the design and since there were so many colors, I opted for twill blocks.  A three block profile was established and this gave me the option of weaving off the blocks with different treadling sequences. 


After carefully weighing the yarns or seeing what yardages were on each skein,  My calculations told me I had enough yarn for 12 yards at 28" wide and I plotted out the color stripes, keeping in mind how many yards of wool I had in each color.

As I started winding the warp on the beam, I found that some of the yarns had more elasticity to them than others.  Warning bells went off in my head.  This would mean that after these yarns were released from tension, they would contract differently than the others, leaving ripples in the finished cloth.  I had to pull off some of my stripes (sectional warping made it possible) and actually buy more yarn to fill in the spaces.  My original stripe plan was altered as I warped - for better or worse, who knew?

I devised several drafts to fit the striping and added a basketweave selvedge to the edges.  I thought that I could do some shawls with blocks of broken twill and some with straight four thread twills.  Because each block of twill requires four shafts, the main body of the shawls required 12 shafts with another four shafts for the selvedge. (16 shafts in all).

Once the loom was warped, I wondered what color weft should I use to unify the dizzying array of color stripes?  I found some nice dark teal wool, a meadow green (the cone said it was cashmere - I'm not convinced) and finally some nubby silk that I dyed in a dark purple blue.

 
I hoped that I would have enough warp for four shawls, but sometimes my block sequence begged for a bit longer piece, so I wove them out at close to 100" more or less.  Big shawls that make a bold statement when worn.
 
I look at the shawls draped on my mannequin and wonder if the orange stripes aren't a bit too bright for the rest of the warp.  The red seems OK, but the orange?  Well, it is what it is.


Sunday, March 12, 2017

Basket weave selvedges for 8 shaft looms

I've been a big fan of basket weave selvedges ever since I was introduced to them by fellow weaver and friend, Sandra Rude.  They work most easily with multishaft looms and liftplans.  However, they can be added to other weaving drafts and this post is to let you know how that can be done.

The reason for using a basket weave selvedge is to keep your edges neat and even and to avoid having to use floating selvedge threads.  Their beauty is that as you throw the shuttle back and forth, your weft catches the edge thread of your woven piece on each throw.  Another reason for using the basket weave selvedge, rather than just a plain weave selvedge (using only two shafts) is that plain weave selvedges take up differently than your main pattern and will give you a ruffled edge, whereas basketweave seems to truck along nicely at the same take up as the rest of your piece.  One of the pitfalls in using this treatment on everything you weave is that it uses up four of your precious shafts. 

The very first thing you need to think about when trying to add this selvedge treatment is that a basket weave selvedge  not only needs four extra shafts, but four picks as well.  The biggest mistake that I have made is thinking I have four shafts for my pattern and four shafts for the selvedge.  But, if I am weaving with a point treadling my sequence will be 1-2-3-4-3-2 which has six picks.  I can manage to weave this if I have a table loom and put my draft into a liftplan or I might be able to work out a more complicated treadling sequence with my floor loom, but it's going to be awkward. Everything needs to end up with a treadling sequence that is a multiple of four so in my example above, the minimum treadling sequence is going to be 12 (which is divisible by 6 - the pattern treadling and 4 the selvedge treadling). 

Once you have decided that your pattern choice is going to work and you are going to proceed, it becomes more straight forward.  I usually put my selvedge threads on the last four shafts, but when working with a multishaft loom, sometimes I put them on the front four shafts for easier repairs should a warp thread break. (This was a tip given by Allen Fannin on Weavetech many years ago).

The example below shows the threads on the last four shafts which have been colored blue in the warp. (Half the threads are on the right side and the other half are on the left side.)  I have used five threads to make the floats smaller between the interior pattern and the selvedge threads, but you can just use four on each side if you like.  Notice the tie up on the last four shafts.  In this example the treadling is a repeat of 8, so the tie up for the basket weave is repeated twice.  Also, the threading for this example makes it necessary  that you start throwing your shuttle from the right side.  You can see that if you started throwing from the left side, you wouldn't pick up the edge thread and nothing would work right after that!  I always keep my selvedge threads in this threading configuration so that I always throw my shuttle on the first pick at the right side of the warp.


The best description of selvedge treatments (that I have found) is in the book Handloom Weaving Technology by Allen Fannin.  It is on pages 264 & 265. The book is fairly technical, but does have other things that will interest handweavers.  If you are interested, used copies are fairly inexpensive. 

After this post was published, another weaver friend pointed out that Peggy Osterkamp discusses the same topic in her book Weaving and Drafting Your Own Cloth on pages 88 & 89.  She refers to this selvedge treatment as "tape selvedges"  and also 2/2 hopsack weave. Peggy's book is crammed with information for weavers and would make a good addition to your weaving library.  Unfortunately, her blog posts about this subject have disappeared!

Cally Booker from Dundee Scotland discusses double weave selvedges - possibly the same thing as tape selvedges.  At any rate, here is a link  to her post  https://callybooker.co.uk/2017/10/comparing-selvedges/

Saturday, March 11, 2017

Experiment with Chenille

Recently I dyed some beige rayon chenille with magenta, reds and blues.  The dyeing process is something I learned in a Kathrin Weber class about a year ago and she calls it "cupcake" dyeing.  Simply put, I dyed the yarn while it was still in center pull balls, thus giving me a variegated yarn.
 
Chenille is lovely stuff, but can be troublesome once woven.  It tends to "worm" in weave structures that have longer floats and many weavers just end up using plain weave rather than risk the piece turning into a bumpy mess after wet finishing.  I decided to experiment with my variegated chenille, using a weave structure with the chenille mostly showing on one side and the other side predominantly showing the 8/2 blue rayon warp, sett at 20 epi.
 
There is lots of color variation in the scarf as you can see from the photos below.  The middle fabric photo is a close up of the chenille side and also the warp face side so that you can see the color differences. Notice also the neat little pattern on the blue side of the scarf.
 
I wet finished the piece and put it in the dryer to make sure that worming wasn't going to be a problem.  It wasn't and I'm satisfied that the fabric will be stable and I can use this technique for future projects.


Should you want to weave your own scarves, the draft is shown below.  The chenille weft is the thicker thread and a finer thread that weaves on shafts 2 and 4 is in orange.  (I used a maroon fine weft to go with the chenille colors, but used orange in the draft so that you could see the structure more clearly).
I also used six treadles to keep my place in the pattern more easily.  Thick, thin, thick, thick, thin, thick.


This last draft is just the reverse side of the draft above.  See how the blue warp is the predominant color on this side.


Sunday, October 2, 2016

Squeezing the Numbers to Design a Weaving Draft

When mathematicians become interested in weaving, the first thing they turn to are ways to express weaving design using the tools they already know so well.  It works in reverse too.  Weavers start using numerical sequences, algebraic equations and more to make their weaving more interesting and give it a new dimension. 

The first mathematical sequence I learned to use in weaving (well, in knitting too) was a stripe generator called the Fibonnaci Sequence.  For years, I used the first numbers in the sequence, not even thinking that maybe I only needed to use just a portion to make interesting designs.  Instead of starting with 0,1,1,1,2,3  maybe I could cut to 3,5,8,13 or just leave it at 3.5.8.  It really only occurred to me recently that I didn't need to reserve the sequence for stripes - it could be also used for profile drafts.  3 - 5 - 8.  Reverse it for a symmetry, add color and you have a fine piece to work from. Another trick to change the look of this profile - change the tie up box and see what happens.

 
When you start looking for these ideas, they seem to just pop out of the woodwork.  I was taking a trip around my Handwoven magazine collection, seeing what I could find in the way of interesting designs for towels.  I ran across an article in Jan/Feb 1998 called Algebraic Expressions:  Design for Weaving written by Lana Schneider. She described a method of design developed by a math teacher called Ada K. Dietz in 1946.  Ada used algebraic equations to create profile drafts, color sequences and even thread by thread sequences for weaving.  Wouldn't it be wonderful if I could actually read Ada's work?  Turns out, the PDF file is available from the Handweaving.net and it's a free download.
 
Well, this was just too good to be true.  It seems Ada instinctively knew that many of us had forgotten what we once knew about the square or cube of a binomial.  She spelled it out for us and gave us some examples showing how she used (a + b)²  The breakdown is in her article, so you don't need to sweat out her procedure all by yourself.  The Handwoven article is nice and tidy and easier to read, so if you have access to that, use it.
 
After reading the document about Ada's work, I jotted down  the letter sequences to use in a variety of experiments.  The draft above was based on the cube of a binomial.  (a + b)³.  When broken down to its most basic form it becomes aaa + aabaabaab + abbabbabb + bbb regroup aaaaa b aa b aa b a bb a bb a bbbbb  (24 units).  I used this sequence as the basis for my twill tie up and then used the sequence again for color in the warp and weft. Once you have pulled the sequences out of Ada's work, you can experiment with a variety of ways to use them.
 
Here is the square of a trinomial represented in a profile draft with colors following the sequence as well.  (a + b + c)²    aa + abab + acac +  bb + bcbc + cc 18 units
 
 
Then, on to Pascal's triangle.  It's fun to google these topics because you come up with  great tutorials for kids (and adults) .  Here is a good one about Pascal's triangle.  I used the fifth row of numbers in Pascal's Triangle for blocks ( 1-4-6-4-1), then mirrored that configuration in the warp.  For the weft, I used the fourth row of numbers (1-3-3-1) and mirrored it as well.  Here is one possible profile draft.  Others can be created by changing the tie-up.
 
These drafts are similar to those built on words.  They are a means to an end and if you don't particularly like what you have created, you can always tweek it to make it more pleasing.  Using this technique for design does help to break down barriers and gets your brain moving in the right direction.  Start with one of these math equations or numerical sequence ideas, expand it  and go from there into something uniquely your own.


Sunday, February 28, 2016

Igor's Japanese Inspired Shawl


The Reno Fiber Guild is doing a year long study of Japanese Textiles.  Igor Raven started out with the idea of weaving a furoshiki (Japanese wrapping cloth) but wanted enough warp to weave a shawl too.  The furoshiki is still waiting to be hemmed, but the shawl has made it through the many layered process and is now a reality. 
 
The first step was to choose a draft.  The Handweaving.net has drafts from the Japanese book,  Orimono Soshiki Hen by Yoshida, Kiju which was published in 1903.  Igor chose draft 44385.  He wanted some gold threads in his piece, so he added another two shafts to the original draft for some plain weave stripes in metallic.  Also, there are 10 plain weave threads on each selvedge to form a border.


Igor's main warp stripes were 10/2 Tencel in bronze and red.  The metallic was a 20/3 thread (incidentally made in Japan) and he used two gold warp threads as one in the stripe between the pattern blocks.


He had planned the warp for 24 epi and a total of 611 threads plus 2 for floating selvedges (weighted separately).  That was 7 pattern repeats and would have used the full width of the special 26" reed for his Baby Wolf loom.  After he started weaving, it became apparent that the sett should be closer, so he resleyed the reed at 25 epi - thus losing that extra width he had planned on.


The weft yarns were two shades of lavender used in alternating shots - also 10/2 Tencel. These colors add an iridescent quality to the cloth when it catches the light at different angles.

Before washing the cloth the fringe was cut to 7 inches and twisted with seed beads added. Washing was by hand in hot water, wrapped in towels and then dried flat.


 It's a luxurious shawl - long and very fluid.  The beads in the fringe catch the light and sparkle.  A successful piece.
 
A little addendum to this post.  Igor's shawl won the best of the handwoven division at the Nevada County Fair (August 2016).