Showing posts with label profile draft. Show all posts

Monday, November 7, 2022

Shadow Weave and Weaving Software

It's been an interesting few days spent exploring weaving software and how to convert a profile draft to a shadow weave draft.  I thought I would share what I learned in a post.

 The conventional ways to convert profiles into shadow weave involve having a profile draft with a tie up that lifts 1/2 of the shafts such as a 2/2 twill or a 4/4 twill tie up.  Most weaving software programs don't give you a block substitution for conversion, but I found three that do.  WeavePoint, Proweave & Windows Weaveit Pro.  

It all started with  a profile draft on Handweaving.net  (#32432) that I liked and wanted to see how it would look in shadow weave. 

Because my weaving software of choice is WeavePoint, I tried translating it to shadow weave using the Translate Profile option.  WeavePoint gave me what I was looking for.  A four shaft, shadow weave design.  Great!

I had my draft and could have stopped there.  But, I didn't.  I wanted to see what other software programs would do and this is where it got interesting.  I found that Fiberworks didn't give me any options to convert profiles to shadow weave.  I did find that there were tutorials to help you do this - but with one caveat, that the tie up be in the format of 2/2, 4/4, 6/6 etc.   I didn't have this in my original profile and if I put a tie up like that into my profile the whole design would be different.  

Then, I tried Proweave.  I don't use this software very much, but it does have a lot of translation options to different weave structures.   I found a bunch of different options, so I took the one for four blocks and no incidentals.  


Great - but this is an 8 shaft draft and the block lengths have been expanded.  I could work on the draft to downsize the length of the blocks, but it didn't seem like a better choice than WeavePoint gave me.

Off to Windows Weaveit Pro.  This program gave me three options for converting my profile.  Atwater method, Powell method and Lang and Voolich method.  This was interesting because I hadn't heard of Lang and Voolich before - something new to me.  My first tries were with Atwater and Powell.  Both of the translations gave me a draft - but not for the original profile.  Instead, the software had evidently changed the tie up to a 2/2 twill because when I changed my profile tie up and looked at the pattern, the translated pattern looked identical to the thread by thread draft.  Next I tried the Lang and Voolich option.  Yeah - it gave me a correct draft, but again, one for 8 shafts.

I could have stopped there, but I really wondered why WeavePoint would give me a 4 shaft draft and the other two programs gave me an 8 shaft draft.

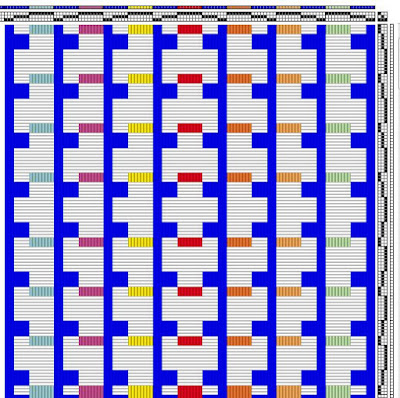
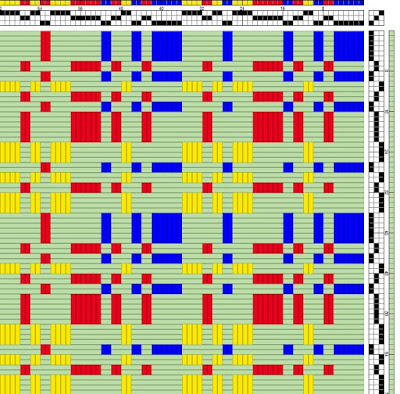
As I looked at the WeavePoint version, I realized that actually the profile was three blocks and Weave Point had analyzed this before it translated my profile.  And, where there was a transition from Block A to Block B, there was a double thread inserted so that the color sequence of dark and light wouldn't be interrupted (examine the first draft in this post).


So, I went back to the three programs to see how they would deal with my new, three block profile.  WeavePoint was happy.  It translated  exactly as it had the first time.  Proweave, translated it to a 6 shaft draft and Windows Weaveit Pro wouldn't give me an option to translate it at all.

 I think if you examine the profile and the solution that WeavePoint gives you, you could probably figure out other profiles.  I also tried to find Lang and Voolich's monograph, Parallel Shadow Weave  but couldn't find any current source for it.  Even Complex Weavers didn't have a copy in their library.  It would be interesting to see how their solution worked - even though it wasn't as elegant a solution as WeavePoint gave me.    

 Yeah for the WeavePoint programmer, Bjorn Myhre.


Sunday, July 16, 2017

Twill Shawls

I was browsing through my yarn stash in early April and stopped to admire the large quantity of Malibrigo wool sock yarns that had been collecting over the past few years.  Each time my local Ben Franklin had a sale, I picked up a new skein.  They are wonderful yarns with so much color it makes my heart sing when I look at them.  (Which is exactly why I bought them in the first place).  I started laying the yarns out  to see how the colors meshed and then added some more sock yarns from my stash that I had dyed and others that a friend had dyed (Wooly Daisy).  Shawls, I thought.  Big woolen shawls with loads of color.

The first thing was the design and since there were so many colors, I opted for twill blocks.  A three block profile was established and this gave me the option of weaving off the blocks with different treadling sequences. 


After carefully weighing the yarns or seeing what yardages were on each skein,  My calculations told me I had enough yarn for 12 yards at 28" wide and I plotted out the color stripes, keeping in mind how many yards of wool I had in each color.

As I started winding the warp on the beam, I found that some of the yarns had more elasticity to them than others.  Warning bells went off in my head.  This would mean that after these yarns were released from tension, they would contract differently than the others, leaving ripples in the finished cloth.  I had to pull off some of my stripes (sectional warping made it possible) and actually buy more yarn to fill in the spaces.  My original stripe plan was altered as I warped - for better or worse, who knew?

I devised several drafts to fit the striping and added a basketweave selvedge to the edges.  I thought that I could do some shawls with blocks of broken twill and some with straight four thread twills.  Because each block of twill requires four shafts, the main body of the shawls required 12 shafts with another four shafts for the selvedge. (16 shafts in all).

Once the loom was warped, I wondered what color weft should I use to unify the dizzying array of color stripes?  I found some nice dark teal wool, a meadow green (the cone said it was cashmere - I'm not convinced) and finally some nubby silk that I dyed in a dark purple blue.

 
I hoped that I would have enough warp for four shawls, but sometimes my block sequence begged for a bit longer piece, so I wove them out at close to 100" more or less.  Big shawls that make a bold statement when worn.
 
I look at the shawls draped on my mannequin and wonder if the orange stripes aren't a bit too bright for the rest of the warp.  The red seems OK, but the orange?  Well, it is what it is.


Sunday, October 2, 2016

Squeezing the Numbers to Design a Weaving Draft

When mathematicians become interested in weaving, the first thing they turn to are ways to express weaving design using the tools they already know so well.  It works in reverse too.  Weavers start using numerical sequences, algebraic equations and more to make their weaving more interesting and give it a new dimension. 

The first mathematical sequence I learned to use in weaving (well, in knitting too) was a stripe generator called the Fibonnaci Sequence.  For years, I used the first numbers in the sequence, not even thinking that maybe I only needed to use just a portion to make interesting designs.  Instead of starting with 0,1,1,1,2,3  maybe I could cut to 3,5,8,13 or just leave it at 3.5.8.  It really only occurred to me recently that I didn't need to reserve the sequence for stripes - it could be also used for profile drafts.  3 - 5 - 8.  Reverse it for a symmetry, add color and you have a fine piece to work from. Another trick to change the look of this profile - change the tie up box and see what happens.

 
When you start looking for these ideas, they seem to just pop out of the woodwork.  I was taking a trip around my Handwoven magazine collection, seeing what I could find in the way of interesting designs for towels.  I ran across an article in Jan/Feb 1998 called Algebraic Expressions:  Design for Weaving written by Lana Schneider. She described a method of design developed by a math teacher called Ada K. Dietz in 1946.  Ada used algebraic equations to create profile drafts, color sequences and even thread by thread sequences for weaving.  Wouldn't it be wonderful if I could actually read Ada's work?  Turns out, the PDF file is available from the Handweaving.net and it's a free download.
 
Well, this was just too good to be true.  It seems Ada instinctively knew that many of us had forgotten what we once knew about the square or cube of a binomial.  She spelled it out for us and gave us some examples showing how she used (a + b)²  The breakdown is in her article, so you don't need to sweat out her procedure all by yourself.  The Handwoven article is nice and tidy and easier to read, so if you have access to that, use it.
 
After reading the document about Ada's work, I jotted down  the letter sequences to use in a variety of experiments.  The draft above was based on the cube of a binomial.  (a + b)³.  When broken down to its most basic form it becomes aaa + aabaabaab + abbabbabb + bbb regroup aaaaa b aa b aa b a bb a bb a bbbbb  (24 units).  I used this sequence as the basis for my twill tie up and then used the sequence again for color in the warp and weft. Once you have pulled the sequences out of Ada's work, you can experiment with a variety of ways to use them.
 
Here is the square of a trinomial represented in a profile draft with colors following the sequence as well.  (a + b + c)²    aa + abab + acac +  bb + bcbc + cc 18 units
 
 
Then, on to Pascal's triangle.  It's fun to google these topics because you come up with  great tutorials for kids (and adults) .  Here is a good one about Pascal's triangle.  I used the fifth row of numbers in Pascal's Triangle for blocks ( 1-4-6-4-1), then mirrored that configuration in the warp.  For the weft, I used the fourth row of numbers (1-3-3-1) and mirrored it as well.  Here is one possible profile draft.  Others can be created by changing the tie-up.
 
These drafts are similar to those built on words.  They are a means to an end and if you don't particularly like what you have created, you can always tweek it to make it more pleasing.  Using this technique for design does help to break down barriers and gets your brain moving in the right direction.  Start with one of these math equations or numerical sequence ideas, expand it  and go from there into something uniquely your own.


Sunday, October 26, 2014

Turned Taqueté - Four Block Profile into an 8 Shaft Draft

Turning a four block profile into an 8 shaft turned taqueté draft isn't as easy or straight forward as the two block, four shaft procedure.  First of all, when you turn a draft you are using the same number of shafts as treadles in the unturned draft.  With many four block profiles, your new turned draft will end up needed 12 or 16 shafts so you need to follow some restrictions in order to get a draft that you can weave on your eight shaft loom.

First of all, keeping your new draft to only 8 shafts only seems to work if your tie up is a 2/2 twill as in the profile below.   There may be other tie ups that work, but I  certainly didn't find any.


4 block profile

 Here is the draft translated to turned taqueté.
 
 
Threading for turned taquete eight shafts with a 2/2 twill tie up in profile
Block A 1-2-3-4
Block B 5-6-7-8
Block C 2-1-4-3
Block D 6-5-8-7


Tie up treadle (1) 1-2 5-6
treadle (2) 3-4 7-8
Blocks AB 1-3-6-8
Blocks BC 1-3-5-7
Blocks CD 2-4-5-7
Blocks AD 2-4-6-8

Alternate treadle 1 and 2 with pattern treadle.
1-P-2-P


I made numerous attempts to do color changes in the warp and use a combination of straight threadings on eight shafts.  I could get a few to look OK, but they all had color lines that looked like errors, so I'm sticking with the plan I laid out above.


Saturday, August 4, 2012

Handwoven Bandanas

Bandanas have always been part of my life and  I grew up using them.  You wrapped one around your hair to keep it out of the way when you had outdoor work to do.  You might use them to mop the sweat from your brow, use a clean one for a napkin, or in some cases as a handkerchief.  My grandfather was never without one and I remember buying him a new one from my meager allowance to give as a Christmas gift.

 It's been several years ago that I woven bandanas, but it was fun and I thought I would share the details since I happen to think they are as practical today as there were in past years.  And, handwoven bandanas will last a lot longer than the flimsy cotton ones imported from wherever they come from these days.

It started with a profile draft.  I played around until I found something that  looked bandana like.  These were going to be woven substituting a 2/1 twill for each of the blocks, making it an 18 shaft weave.

profile draft for bandana

I had lots of 16/2 unmercerized cotton, so I wound a 9 yard warp, 30" wide and sett at 30epi. For each bandana, I varied the treadling sequence and since the warp was red, sometimes I used white, natural, black or navy for the weft.  It resulted in 10 bandanas and I made a note that I should have used a basketweave selvedge since I had enough shafts to do that.  As a result of a not so perfect selvedge, the bandanas were hemmed on all four sides.

I've given away some to special friends who love to hike - one to a gardening daughter and kept one for myself.  I still have some to share with my handwoven loving customers.  I hope they will enjoy using them or giving them to outdoor folks - who sometimes need a bandana!


I thought that this Wikapedia entry was interesting about the origins of the bandanna - bandana or kerchief.  Whatever you want to call them or however you want to spell them, they are fun to wear.