I have loved Marian Stubenitsky's book Weaving with Echo and Iris since I first purchased a copy over 10 years ago.
I immediately wanted to start weaving some of the draft in the book but also learn how to create my own drafts. One of the big hurdles I immediately encountered, was that when using one of the big tie ups for double weave, it was hard going to copy it into my software without making a mistake. I did some by hand and expanded a few so that I could weave on my 40 shaft loom (this book only goes up to 32 shafts).
Recently, I picked one of my old 40 shaft drafts from 10 years ago for my *CW 24+- sample exchange. The draft I picked had never been tested, but it worked just fine. I confessed in my write up that went with the sample that I didn't understand the tie up, but somewhere in the hazy past, I must have understood something in order to get a tie up that wasn't in the book.
One of the members in our exchange asked me some questions about how it was designed, and how did I get a draft with 80 treadles? Well, the 80 treadles is easy because I have WeavePoint and it allows me up to 128 treadles! How did I design it? I think I just copied the sequence for a 32 shaft tie up and extended it to 40 shaft, but I can't be sure.
At any rate, this set me off on a journey of discovery. The weaver who was interested in the draft pointed out that a method for constructing tie ups for four color double weave had been documented by Bonnie Inouye and Marguerite Gingras. Marguerite had written an article in CW about the process, as had the member who was now asking me questions about my design process. I was aware of the articles and wondered what process Marian had used to create her tie ups and how could I utilize this other method by Inouye and Gingras to pull out the tie ups in the Echo and Iris book without the painstaking drawing by hand method.
I thought about it, read more in the Weaving with Echo and Iris book and then started experimenting.
It turns out to be pretty simple to get the tie ups into Marian's format and since these big drafts all require a dobby, to turn them into a liftplan.
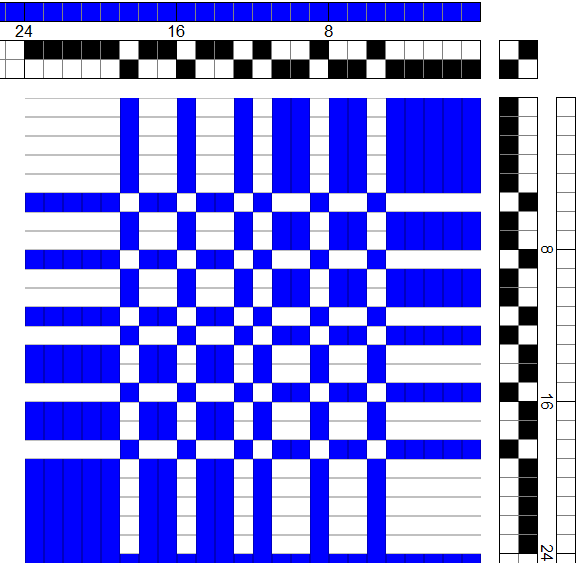
Here goes. On page 104 of Echo and Iris, there are two 16 shaft tie ups. On the left top is the bare bones tie up and on the right a tie up with a ratio of 2:6. The very first treadle is the key to the rest of the tie up. Working from the bottom to the top, the first 8 shafts are written for plain weave. The next are the ratio tie ups. First two shafts are lifted, then 6 are left down.
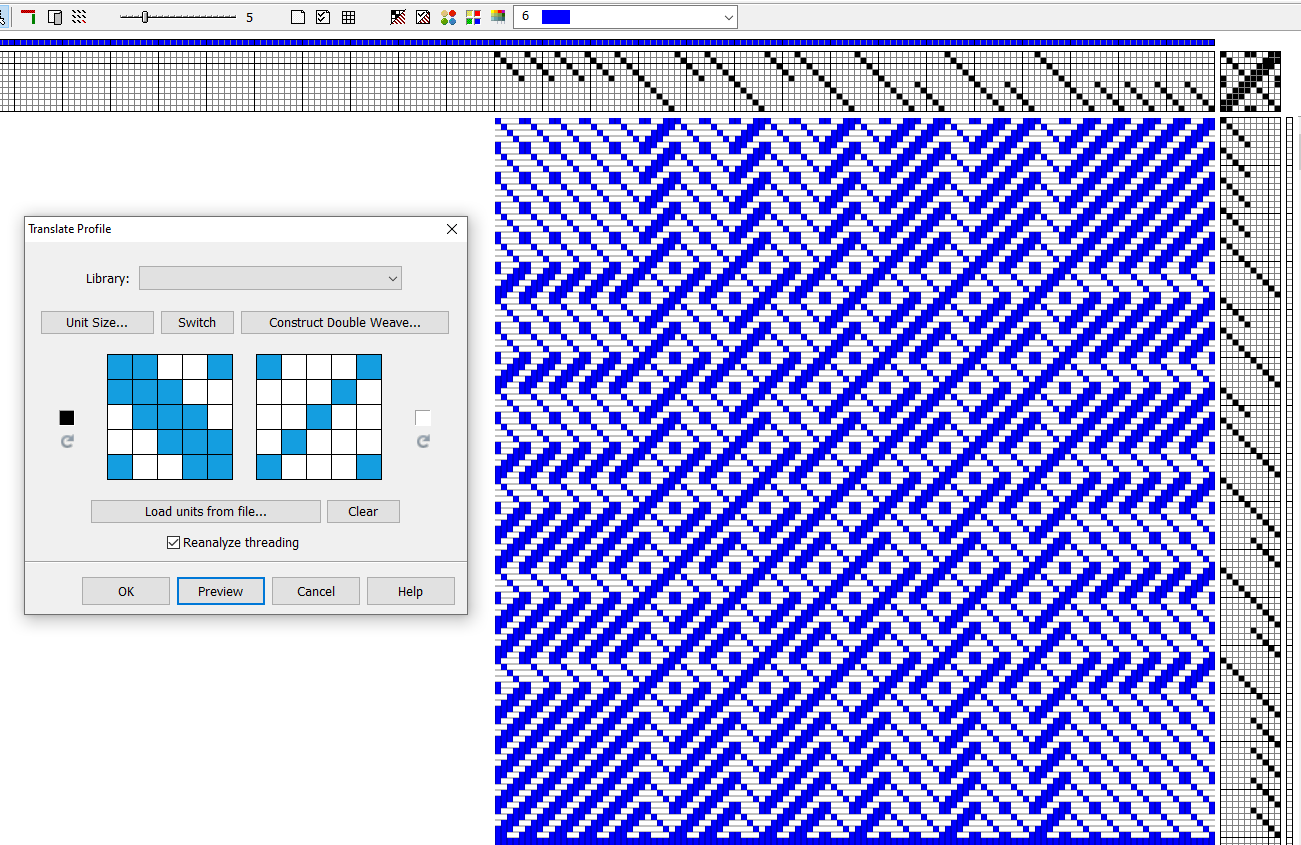
Using this information, I started a draft with WeavePoint for 16 shafts and 16 treadles. I used this information to create a tie up. I put in the first treadle information and clicked on Utilities - Tie Up Special Effects - create tie up using "Make Twill from Treadle One". This tie up is the one on the left side of the tie up box in the photo below.
The next step is to copy that tie up just created and paste it into another section of the tie up making it now 32 treadles. This tie up is then selected and then click on Edit and option Modify.
At this point, you can manipulate this second tie up. Click Invert and then cycle up 8 time using the arrows and click OK. The reason you cycle up 8 times is that this is 1/2 of the total number of shafts and you are cycling up to create the tie up for the second pick which will be the reverse of the cloth.
You will notice that both the threading and the treadling are in parallel format - which is explained on page 9 in Marian's book. You can also see that the first tie up in the photo above weaves the top side of the fabric, and the second pick weaves the other side of the fabric.
This is as far as you need to go to create a liftplan. But, we should check what the tie up looks like after I have converted to a liftplan and then reverted back to a tie up mode.
Yep, it looks like the tie up in the book and it was easier to achieve than copying out of the book. You can also see that I was able to use the full 32 treadles in my design process and that once I converted back to tie up mode, WeavePoint changed the treadling to conform to this format.
I made one more conversion. I turned this draft so that the pattern is vertical rather than horizontal. The new draft requires 32 shafts and is still double weave.
Here are a couple of references about using this tie up technique for Four-Color Double Weave. Both of these articles have detailed instructions on creating the two tie ups you will need for face and back of fabric.
Complex Weavers Journal, Oct. 2019 (#121) page 11. Adventures in Four-Color Double Weave by Jami Johnson
Complex Weaver Journal, Oct. 2011 (#97) page 18 Four-Color Double Twills by Marguerite Gingras from the Computer Aided Design Exchange Study Group. Marguerite lists the PCW tools she used and the sequence to achieve the two tie ups.
If you join Complex Weavers, you can download copies of both of Journals and read the articles for yourself.
Also, if you own the Weaving with Echo and Iris book, look on page 111. Marian describes this process from Bonnie and Marguerite with additional details about altering it for different effects.
*CW is the common abbreviation for the Complex Weavers group.