Thursday, September 22, 2011

Solar Natural Dyeing - Part II

red sandlewood, alkanet root, cochineal, cochineal, osage orange and dodder.  
Igor had a project on the loom in colors similar to these.  He thought about making a shawl in the same colors and same pattern, so I thought it might be a fun thing to see if I could replicate the colors in his scarves.  My colors are more subdued and I didn't manage to get purple, but I liked the way they all go together.  The yarn is baby alpaca and silk from Henry's Attic.

After a false start with the red sandlewood powder, I found that the dye needed to be extracted with alcohol before I used it in the dye pot.  The alkanet root was the same procedure.  Cochineal bugs were ground and boiled to extract their dye (very potent stuff).  Osage orange wood had been run through my chipper and sat in a water filled plastic bucket for weeks and weeks in the sun until the liquid was almost black.  The dodder was a whim.  I had heard that it could be used in natural dyeing, but had never tried it.  I found some growing on local bindweed plants and collected a bunch.  I extracted the dye in the same solar method as I had with the osage orange.  Looked like plenty of color before I dyed with it, but it was pretty weak.  I think you would need to collect a lot to get more color and I suspect that other species that are oranger in color might work better as well.


Fustic, Osage Orange, Wolf Lichen
Here are some skeins of  dyed handspun.  The fustic was from an extract, but dyed solar.  The osage orange is on stretch Merino, sun dyed and the last wolf lichen skein was dyed after I boiled the lichen for several hours.  I really like the fustic skein color right now, but wouldn't it make a wonderful green with an indigo overdye?

Everything here was mordanted with alum, except the wolf lichen skein.  Many lichens are substantive (plant material acts as a mordant).

Tuesday, September 20, 2011

Solar Natural Dyeing Part 1 - Madder

There's lots that is wonderful about living in the country.  But there are a few things that aren't great.  One is living with well water.  My well has lots of iron in it and tends to be a bit murky when it is being fed with winter snow melt.  That's not great for dyeing  - natural or synthetic.  So I collect water when it rains in buckets and melt snow water when it snows.  Then in the summer, I have a source of fairly pure water for my dyeing experiments.

For quite a few years now, I have tried to harness the power of the sun to heat my mordant pots and extract some dyes.  I bought some great clear 5 and 2 1/2 gallon buckets with clear lids from a restaurant supply place.  They were sort of expensive, as I remember, but I have been using them quite a while now and since they were good quality plastic, they are holding up well.  With lids on tight, the liquids in the buckets get pretty hot on a warm summer's day.  Too hot to hold your hand in the liquid.


This summer I had plans for lots of natural dyeing to get rid of some of the large stash of plant material I have stored.  Plus, I had harvested my madder plants that had been growing for 7 years last fall.  I chopped  up roots and put them in a crock pot to heat and reheat in the early spring.  At first, the yarn was a brownish red.  I cranked up the heat a bit and got more color.  Then, I took out the roots and chopped them a little finer - more color.  Finally as skeins got to be cherry red, the pot ran out of steam and lapsed into a soft peach.  I might have gotten more color, but I was tired of the process and called it quits. 

Handspun wool dyed with madder roots.
I have more madder in my dye supplies and will have another go at dyeing handspun later this fall or winter.  But, I must say dyeing with plants I had nurtured for several years was pretty cool.

8/2013 I just found this little U-Tube Video about dyeing with madder root.  Not a lot of information, but instructive about not getting the roots too hot.


Thursday, September 15, 2011

A wonderful draft and I don't know what to call it!

This year I started out with a resolution to learn some new things and think a bit outside my comfort zone - in all things, not just weaving.  I've been weaving more than blogging, but I'm hoping that is about to change too because I've had some good adventures in trying new things.

One of the biggest hurdles for me in doing something new is that I really don't like failures anymore.  Truth is, I've never been comfortable with failures and it keeps me from taking chances.  Good trait for staying alive, but not so good if you want to gain new skills..  Over the next few months, I'll share some of my experiences.  Mostly, it's been good stuff to share and luckily I didn't take pictures of some of the more stressful moments in learning to warp with a paddle.  But, I'll write a bit about it in a later post.

One of the first things I started out with this year was making some lap robes for local seniors in a project called Holiday Cheer.  I wasn't selling much in the way of shawls - bad economy or maybe my shawls aren't as fabulous to other folks as they were to me:-)  I thought that weaving for a good cause might be the ticket to trying something new.  I read a bit about the sizes for lap robes, that they shouldn't have fringe if you were using them in a wheelchair and that they needed to be machine washable and dryable.  I settled on using up some rather thick cotton yarn I had in two colors - red and brown.  They wrapped at 20 epi.  I futzed around with this draft and that, but nothing hit my fancy.  I thought about doing them in network twills, but then remembered a recent article in Handwoven (March-April 2011) by Mary Berent.  She used turned taquete for dish towels sett at 40 epi.  I figured if I used 20 epi with my yarns, they would result in the warp face I needed for my heavier lap robes.   I didn't find the draft in Handwoven instructive enough for me to do my own design, so I went in search of other information about drafting it. What I came up with isn't turned taquete , but I stumbled across a design that worked beautifully.  I converted my design threading (in this case I used a network threading from a previous project) to a parallel threading.  The tie up for 24 shafts was a 12/12 twill.  For 8 shafts the tie up would be 4/4 twill.   Add an alternating tabby or basket tie down with an interesting treadling sequence and you have the recipe for a warp faced design with lots of drape.


I wove six lap robes using a 16/2 red cotton weft that virtually disappears.  They are about the size of beach towels and have a pleasing heft to them.  One of the wonderful things about the threading was that I could weave a double weave hem. I wove a top and bottom layer and tucked the fabric back inside itself and closed it with a blind stitch.

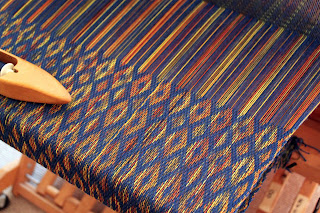
Having had one success led me to another project on my Baby Wolf.  Eight shafts with a point threading and treadling led to the draft shown below.


This project was outside my color comfort zone and was therefore appropriate for my year long study. 


Painted super-wash wool that I dyed a couple of years ago along with dark blue Alpaca for the warp.  The weft was 20/2 rayon in navy.  The navy weft tones down the bright colors of the super-wash wool but is still not intrusive on the overall design.

 Hey - this is a pretty neat structure. Does anyone have a name for it?